

Good news: Most UK homes don't have existing doorbell wiring — and you don't need it. Here's exactly how to install a video doorbell yourself, step by step, in under an hour. So, how to Install a Video Doorbell Without Existing Wiring? Let's get into it!
Table of Contents
The UK Wiring Problem
Here's something most video doorbell guides don't mention: the UK has a specific wiring problem that catches people out.
British homes that have a wired mechanical doorbell almost always run on 8V AC, sometimes 12V AC. Many "wired" video doorbells — including some early Ring and Nest models — were designed for the American market, which uses 16–24V AC. If you connect one of these to UK wiring, it either fails to power on or, worse, fails to charge its internal battery while appearing to work.
The safest solution for most UK homeowners is to skip wiring entirely and go battery-powered. Here's how to do it properly.
What You'll Need
Before you start, gather these tools — most come in the box with your doorbell:
- Power drill with masonry bit (for brick walls)
- Screwdriver (Phillips head)
- Spirit level (some kits include a mini one)
- Pencil for marking holes
- Wall plugs/anchors (usually included)
- Smartphone with Wi-Fi connection
- Charged doorbell battery — charge it fully before installation
Step 1: Choose Your Location
This matters more than most people realise. Get it wrong and you'll either miss visitors or trigger constant false alerts.
Height: Install at 2.4 metres from the ground. Yes, this is higher than the standard 1.2–1.5 metres most guides suggest. Here's why:
- Modern wide-angle lenses (150°+) compensate for the angle
- It's harder for thieves to grab
- You get a better view of the full body, not just heads
Position: Mount it to the side of the door frame rather than directly above — this gives a better angle on faces as people approach.
Wi-Fi signal: Check your signal strength at the mounting location before drilling anything. Hold your phone there and run a speed test. If it's weak, consider a Wi-Fi extender before installing the doorbell.
Sun angle: Avoid mounting where the lens points directly into the afternoon sun — you'll get constant glare and washed-out footage.
Step 2: Mark and Drill
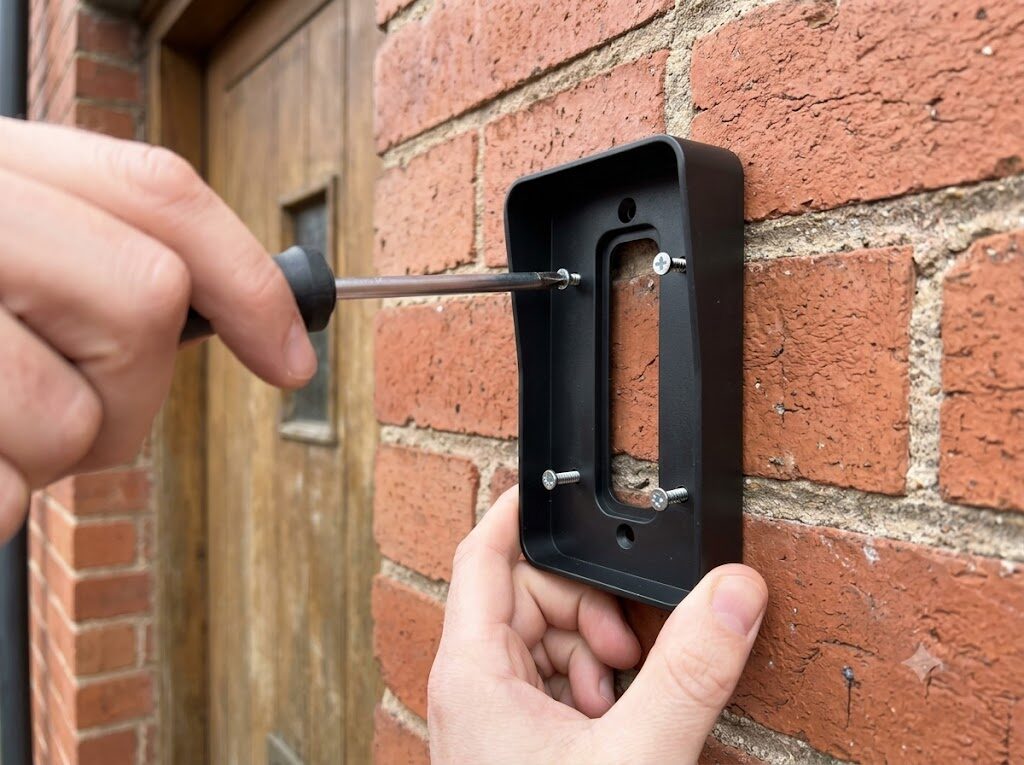
- Hold the mounting bracket against the wall at your chosen position
- Use a spirit level to make sure it's straight — a wonky doorbell looks unprofessional and affects the camera angle
- Mark the screw holes with a pencil
- For brick walls: Use a masonry drill bit. Drill slowly and don't force it. Insert wall anchors (rawl plugs) into the holes
- For UPVC or wood: Use the standard screws provided — no anchors needed
- Attach the mounting bracket with the screws
Step 3: Attach the Doorbell
Most battery-powered doorbells clip or slide onto the mounting bracket. The exact method varies by model:
Eufy Video Doorbell E340: Slide onto the bracket from the top. Tighten the security screw at the base with the included tool. Local storage means footage is safe even if your internet drops.
Ring Battery Doorbell Plus: Click the doorbell onto the bracket from the top down. You'll hear a click when it's secure. Use the included security screw at the bottom to prevent removal.
Google Nest Doorbell (Battery): Press onto the bracket until it clicks. The release mechanism is at the bottom — Nest doesn't include a security screw by default, so consider purchasing a third-party anti-theft mount.
TP-Link Tapo D230S1: Battery-powered (6700mAh removable battery, up to 180 days). Install like any other battery doorbell in the steps above.
Arlo 2K HDR Video Doorbell: Slide onto the bracket and secure with the provided screw. The 180° wide-angle lens compensates well for higher mounting positions.
Step 4: Connect to Wi-Fi and Your App
- Download the manufacturer's app:
- Ring → Ring app (iOS/Android)
- Eufy → eufy Security app
- Nest → Google Home app
- Arlo → Arlo Secure app
- Tapo → Tapo app
- Open the app and select "Add Device" or "Set Up New Device"
- Follow the on-screen instructions — you'll need your Wi-Fi password
- The app will guide you through connecting the doorbell to your network. This usually takes 3–5 minutes
- Once connected, test the motion detection by walking in front of the doorbell and checking that an alert appears on your phone within a few seconds
Step 5: Set Up Your Chime
Battery-powered doorbells don't connect to your existing wired doorbell chime. You have three options:
Option A — Use the app notification Your phone buzzes when someone rings. Simple, but you'll miss it if your phone is on silent.
Option B — A plug-in chime Ring sells the Ring Chime (around £25) — plug it into any wall socket and it rings when someone presses the doorbell. Eufy has a similar HomeBase unit.
Option C — Smart speakers If you have an Amazon Echo or Google Home speaker, you can configure it to announce when someone is at the door — no extra hardware needed.
What About Renters?
Battery-powered doorbells are ideal for rented properties. You're not cutting into walls or dealing with wiring — just a few small screws in the door frame or wall.
A few things to check:
- Permission: Check your tenancy agreement. Most landlords are fine with battery doorbells, but it's worth a quick message to confirm
- Adhesive mounts: Some brands offer adhesive mounting plates — no drilling required. These work on smooth surfaces like UPVC door frames but are less secure on brick
- Portability: Battery doorbells come with you when you move — a genuine advantage over wired models
The Eufy E340 and Ring Battery Doorbell Plus are both excellent choices for renters — easy to install, easy to remove, and no damage to walls.
Installing a Wired Doorbell Without Existing Wiring
If you want a wired installation where no wiring currently exists, you have two options:
Option A — Run new wiring (not recommended as DIY)
Running low-voltage doorbell wire from a transformer near your consumer unit to the front door involves drilling through walls. Unless you're comfortable with this, hire an electrician. A local handyman will typically charge £80–£150 for a straightforward doorbell wiring job.
Option B — Use a power adapter
Some wired doorbells can be powered via a plug-in transformer that connects to a standard 13A UK socket near the door. The TP-Link Tapo D230S1 is an excellent battery-powered budget option — 6700mAh battery, up to 180 days per charge, great value at under £60.
Common Installation Problems (And How to Fix Them)
"My doorbell keeps going offline" Usually a Wi-Fi signal issue. Move your router closer, or install a Wi-Fi extender. Doorbells are power-hungry for Wi-Fi — they need a strong signal.
"Motion alerts keep triggering for cars and pedestrians" Adjust the motion sensitivity in the app. Most doorbells let you draw a custom "activity zone" — set it to only cover your doorstep, not the pavement.
"The night vision is dark and grainy" Check that the lens is clean. Also check there's no direct light source (a street lamp or porch light) shining directly into the lens, which can confuse the night vision sensor.
"The battery drains faster than expected" Cold UK winters significantly reduce battery life. Consider enabling scheduled recording rather than continuous motion detection. The Eufy E340 handles UK winters best — up to 6 months per charge.
"My app isn't receiving notifications" Check notification permissions in your phone settings. Also ensure the app is allowed to run in the background — many Android phones aggressively kill background apps.
Installation Height Guide — At a Glance
| Height | Pros | Cons |
|---|---|---|
| 1.0–1.2m | Easy to reach to press | Easy to steal, misses packages |
| 1.5m (standard) | Good face coverage | Reachable for thieves |
| 2.0–2.4m (recommended) | Theft-resistant, wide view | Need ladder to install |
| Above 2.5m | Very theft-resistant | Poor face angle, too wide |
Recommended Battery Doorbells for UK Installation
| Doorbell | Price | Battery Life | Subscription? |
|---|---|---|---|
| Eufy E340 | ~£160 | 6 months | None |
| Ring Battery Doorbell Plus | ~£130 | not stated | £4.99/month |
| Google Nest Doorbell (Battery) | ~£160 | 2–2.5 months | Optional |
| Arlo 2K HDR | ~£120 | 3–6 months | Optional |
| TP-Link Tapo D230S1 | ~£50 | Wired | None |
Frequently Asked Questions
Do I need to turn off power to install a battery doorbell? No — battery-powered doorbells have no mains connection. You can install them safely without touching your consumer unit.
Can I install a video doorbell on a UPVC door frame? Yes — UPVC is easy to drill and doesn't need wall anchors. Use the screws provided and avoid overtightening.
Will my existing indoor chime work with a battery doorbell? No — battery doorbells don't connect to traditional wired chimes. You'll need a plug-in chime or use a smart speaker.
How long does installation take? For a battery doorbell, 20–45 minutes including app setup. For a wired doorbell where wiring already exists, 30–60 minutes.
Do I need a professional to install a video doorbell? For battery models — no. Anyone comfortable with a drill can do it. For wired models where new wiring is needed — yes, hire an electrician.
As an Amazon Associate, we earn from qualifying purchases at no extra cost to you. Prices correct at time of writing and verified on Amazon UK.